Beginner’s Guide: Post 13
Alright, you’re starting to get the hang of reading charts. You can spot the story the candlesticks are telling, and you have an idea of where the market’s potential floors and ceilings are. You see a setup that fits your plan and you think, “Okay, it’s time.”
Now what?
How do you translate that analysis into action? How do you actually tell your broker, “I want in right here, and I’m out if it goes there”? This is where understanding trading order types becomes one of the most critical skills you can learn. It’s the bridge between your plan and your P&L.
Our team has seen countless new traders with brilliant chart analysis completely sabotage themselves with clumsy execution. They use the wrong tool for the job, get a terrible price, and turn a potential winner into a loser before it even has a chance.
This guide is your playbook for execution. We’re going to break down the essential order types—Market, Limit, and Stop orders—and show you not just what they are, but how and why a professional day trader uses them to manage risk and execute with precision.
What you’ll learn:
- The critical differences between Market, Limit, and Stop orders.
- Why day traders almost always prefer one order type over the others for their entries.
- How to use a combination of order types to build a complete trade, from entry to protective stop to profit target.
- How to practice placing these orders in a simulated environment to build muscle memory.
Estimated time to complete: 15 minutes
Prerequisites: Reading the Story of Price: An Introduction to Candlestick Charts
Why Understanding Trading Order Types is Non-Negotiable for Day Traders
Think of it like this: a carpenter has a hammer, a saw, and a drill. All are useful, but you wouldn’t use a hammer to cut a piece of wood. In day trading, your order types are your core tools. Using the right one depends entirely on your objective for a specific action.
Is your priority speed (“Get me out, I don’t care about the exact price!”) or is it price precision (“I will only buy at this specific level or better”)?
The answer to that question dictates which order type you use. For a day trader, where small price differences can be the difference between a profitable day and a losing one, this choice is everything. It’s the practical application of The Power of Discipline: Sticking to Your Trading Plan, ensuring your actions in the market align perfectly with the rules you set beforehand.
The 3 Core Order Types Every Day Trader Must Know
Let’s break down the workhorses. You’ll use these three on 99% of your trades.
1. Market Orders: The “Get Me In NOW” Button
A market order is the most basic instruction: “Buy or sell for me immediately at the best price currently available.” You’re telling your broker that speed is your only priority.
- The Good: It’s fast. In a liquid market, your order is almost guaranteed to get filled within moments.
- The BAD (and Ugly): Slippage! This is the killer for day traders. “Best available price” might not be the price you saw on your screen. In the split second it takes for your order to travel to the exchange, the price can change. This difference is called slippage. If you’re trying to buy at $50.00, you might get filled at $50.05. Five cents might not sound like much, but over hundreds of trades, it’s a massive hidden cost that erodes your edge.
Our Team’s Take: We almost never use market orders to enter a trade. The risk of slippage is just too high and gives up too much control. Its primary use might be for a catastrophic “get me out now at any cost” exit, but even then, a stop order (which we’ll get to) is the more disciplined tool.
2. Limit Orders: The “Only at MY Price” Command
This is the professional’s choice. A limit order gives you control over price. It’s an instruction that says: “Buy or sell, but only at this specific price or better.”
- Buy Limit Order: Placed below the current price. It says, “I want to buy, but only if the price drops down to my level.”
- Sell Limit Order: Placed above the current price. It says, “I want to sell my position, but only if the price rallies up to my target.”
Pros vs. Cons:
- Pro: You have absolute price control. You will never get a worse price than what you specified. No slippage on your fill price.
- Con: There’s no guarantee your order will get filled. If the price never reaches your limit, your order just sits there, and you might miss the trade entirely.
Our Team’s Take: This is our go-to for both entering trades (buying on a pullback to a specific support level) and taking profits (selling at a pre-defined resistance level). The price control it offers is essential for calculating an accurate Risk/Reward ratio before entering. Knowing your exact entry price is a pillar of sound risk management.
3. Stop Orders: The Automated “Safety Net”
A stop order is a dormant order that activates and becomes a market order only when a specific price—your “stop price”—is touched.
- Analogy: Think of it like a tripwire. The market is quiet, nothing is happening… until the price hits your wire. Then, boom, the order instantly becomes a live market order to get you out.
Primary Use Case: The Stop-Loss! This is its most critical function. A Sell Stop Order is placed below your entry price. If the trade goes against you and the price drops to your stop level, it triggers the market order to sell, automatically limiting your loss. This is the single most important risk management tool you have. We dedicated a whole guide to this concept in “What is a Stop-Loss Order and Why You MUST Use It.”
Secondary Use Case: Entering Breakouts A Buy Stop Order is placed above the current price. Traders use this to enter a trade automatically if a stock breaks out above a key resistance level, hoping to catch the upward momentum.
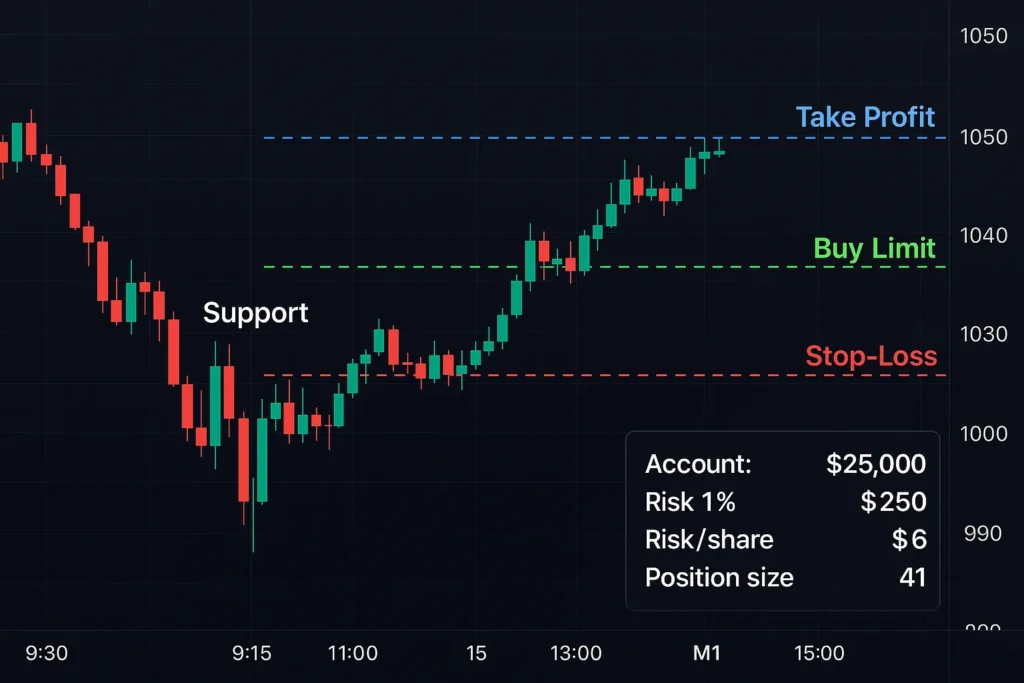
Real Trade Simulation: Putting Order Types to Work on NVDA
Theory is great, but let’s see how this works in a real, high-pressure situation.
- The Scenario: It’s the morning of May 23, 2024. NVIDIA (NVDA) has just reported blockbuster earnings the night before. The stock is gapping up massively in the pre-market, and we know it will be volatile. Our team wouldn’t chase the initial spike at the open; that’s a rookie move. The plan is to wait for the initial frenzy to die down and buy the first significant pullback to a support level.
- The Tool: A high-volume, news-driven stock like this is exactly what a scanner like the one from Trade Ideas is built to find. It would be at the top of any “Top Gappers” list that morning.
The Plan in Action:
- The Entry (Buy Limit Order): After opening near $1020, NVDA pulls back. We identify the psychological whole number of **$1000.00** as a potential support zone where buyers might step in. We don’t want to buy at market; we want a specific, favorable price. So, we place a Buy Limit Order at $1000.00.
- The Protection (Sell Stop Order): Before we even think about profit, we define our risk. The intraday low was established around $995. Our trade idea is wrong if it breaks that low. We place our protective Sell Stop Order at $994.00, just below that key support level. This is our stop-loss.
- The Target (Sell Limit Order): If the trade works, where might it run to? The stock showed resistance near the day’s high later on. A logical first target would be a round number before that, say $1050.00. We place a Sell Limit Order at $1050.00 to automatically take profits if the price reaches it.
The Position Sizing Math:
- Account Size: $25,000
- Risk per Trade: 1% ($250)
- Risk per Share: $1000.00 (Entry) – $994.00 (Stop) = $6.00
- Position Size: $250 ÷ $6.00/share = 41.6 shares. We round down to 41 shares.
By using this combination of trading order types, we have a complete, disciplined plan: a precise entry, a pre-defined maximum loss, and an automated profit target.
Advanced Order Types & Conditions to Know
While the main three will be your daily drivers, it’s good to be aware of these.
- Stop-Limit Orders: A hybrid. When the stop price is hit, it places a limit order instead of a market order. This gives you price control on your exit but runs the risk of not getting filled at all in a fast-moving market, which can be dangerous for a stop-loss.
- Trailing Stop Orders: A dynamic stop-loss that automatically moves up as the trade moves in your favor, protecting profits while giving the trade room to run. A fantastic tool once you’re more experienced.
- Order Duration: You can typically set an order as a ‘DAY’ order (it expires if not filled by the end of the day) or ‘Good ’til Canceled’ (GTC), which stays active until you cancel it. For day trading, you’ll almost always use DAY orders.
For a full list of terms, you can always check our comprehensive Day Trading Dictionary.
Your Turn to Practice: An Order Entry Exercise
Knowledge is useless without practice. It’s time to build some muscle memory.
- Open your paper trading account. We recommend a platform with great charting like TradingView.
- Pull up a chart of any highly liquid stock (e.g., AAPL, MSFT, SPY).
- Identify a clear support level below the current price and a clear resistance level above it.
- Practice placing a complete trade just like our NVDA example:
- Place a Buy Limit Order at the support level.
- Simultaneously place a Sell Stop Order a bit below that support level.
- Simultaneously place a Sell Limit Order at the resistance level.
- Cancel the orders and repeat. Get comfortable with your platform’s order entry window. Know exactly where to click without hesitation. This is the core skill you need to build, and you can learn more in our guide on how to use a paper trading account effectively.
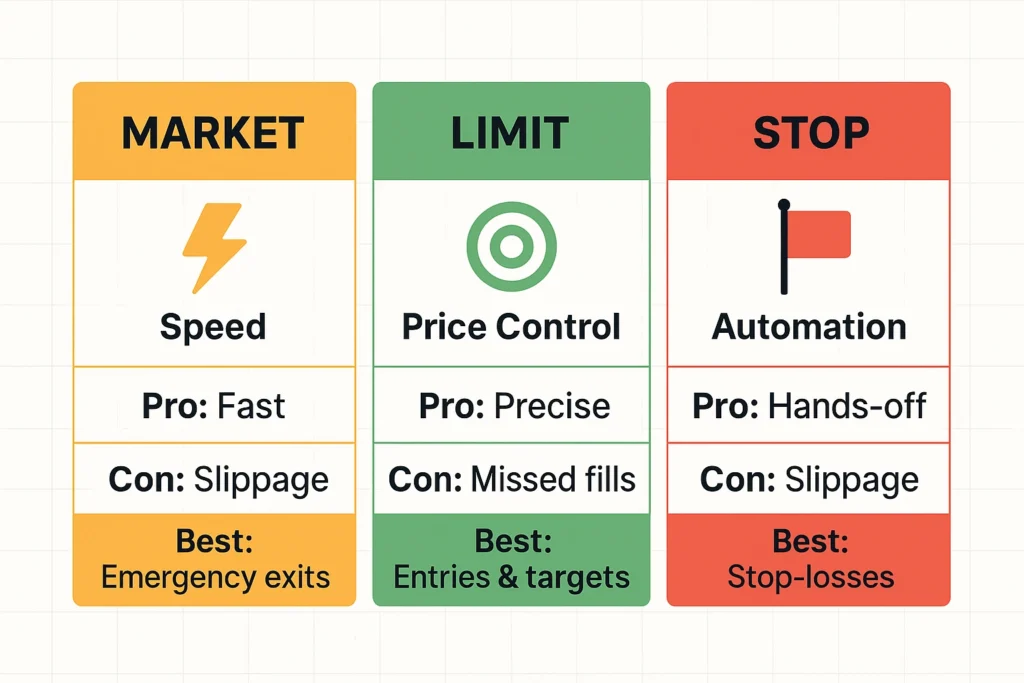
Key Takeaways: Choosing the Right Order for the Job
| Order Type | Primary Goal | Best For… | Biggest Risk |
|---|---|---|---|
| Market Order | Speed | Getting out in an emergency. | Slippage (bad fill price). |
| Limit Order | Price Control | Precise entries and profit targets. | No Guaranteed Fill (missing the trade). |
| Stop Order | Automation | Stop-Losses (non-negotiable). | Slippage (once triggered). |
Frequently Asked Questions about Trading Order Types
What are the 3 main types of trade orders?
Quick Answer: The three main trading order types are Market Orders, Limit Orders, and Stop Orders. Each serves a distinct purpose for entering or exiting a trade based on either speed or price precision.
A Market Order executes immediately at the best available price, prioritizing speed. A Limit Order executes only at a specific price or better, prioritizing price control. A Stop Order is a dormant order that activates and becomes a market order when a specific price is reached, primarily used for protection (stop-loss) or entering breakouts.
Key Takeaway: Master the use of Market, Limit, and Stop orders, as they form the foundation of disciplined trade execution.
What is the difference between a market order and a limit order?
Quick Answer: A market order guarantees execution but not the price, while a limit order guarantees the price but not the execution. It’s the classic trade-off between speed and certainty of price.
When you place a market order, you are telling your broker to fill your order immediately, regardless of small price changes (slippage). When you place a limit order, you specify the exact price you are willing to accept. If the market does not reach your limit price, the order will not be filled. Day traders generally prefer limit orders for entries to control costs.
Key Takeaway: Choose a market order for speed and a limit order for price precision.
Should a beginner use market or limit orders?
Quick Answer: Beginners should almost always use limit orders for entering and taking profit on trades. This builds the crucial habit of controlling entry and exit prices and avoids the hidden cost of slippage.
Market orders can be destructive for new traders who don’t understand slippage. By forcing yourself to use limit orders, you learn to plan your trades around specific price levels identified through technical analysis. Market orders should only be considered for emergency exits, but a stop order is the proper tool for that.
Key Takeaway: Prioritize learning with limit orders to build discipline and control your trade execution from day one.
What is the difference between a stop order and a stop-limit order?
Quick Answer: When triggered, a stop order becomes a market order, guaranteeing an exit but not the price. A stop-limit order becomes a limit order, guaranteeing the price but not the exit.
A standard stop order is designed to get you out of a losing position quickly. A stop-limit order adds a second price, the limit price, defining the worst price you’re willing to accept. The risk is that in a flash crash, the price could gap past your limit price, leaving you stuck in a losing trade. For this reason, many traders prefer the certainty of execution from a standard stop order.
Key Takeaway: Stop orders prioritize getting out, while stop-limit orders prioritize getting out at a specific price, which comes with the risk of not getting out at all.
When should I use a stop order?
Quick Answer: You should use a stop order on every single trade as your stop-loss. This is the most critical risk management practice for protecting your capital from significant losses.
A stop order’s primary function is to serve as an automated, disciplined exit for a trade that moves against you. Before entering any position, you should know the price at which your trade idea is proven wrong and place a stop order there. It removes emotion from the decision and ensures a small mistake doesn’t turn into a catastrophic loss.
Key Takeaway: Using a stop order as a stop-loss is a non-negotiable rule for survival in trading.
What is the main disadvantage of a market order?
Quick Answer: The main disadvantage is slippage, which is the difference between the price you expected and the actual price at which your trade is executed. Slippage is a direct cost to your trading.
In fast-moving markets, the “best available price” can change in milliseconds. A market order will chase that price, often resulting in you paying more when buying or receiving less when selling. This negative slippage can significantly impact the profitability of a day trading strategy over time.
Key Takeaway: Slippage makes market orders an expensive and imprecise tool for day traders.
What is the main disadvantage of a limit order?
Quick Answer: The main disadvantage is that there is no guarantee your order will be filled. If the market price never reaches your limit price, you will miss the trade opportunity entirely.
By setting a specific price, you run the risk that the stock reverses just before touching your entry price, or that your profit target is never quite reached. This can be frustrating, but it’s the trade-off for gaining complete control over your execution prices.
Key Takeaway: The price control of a limit order comes with the risk of the trade leaving without you.
Is a stop loss a market or limit order?
Quick Answer: A standard stop-loss is a type of stop order that, once triggered at your specified price, becomes a market order to ensure your position is closed quickly.
The goal of a stop-loss is to exit a losing trade reliably. By converting to a market order, it prioritizes execution over price, which is generally what you want when a trade goes wrong. While stop-limit orders exist, the standard stop (to market) order is the most common form of stop-loss.
Key Takeaway: A standard stop-loss order becomes a market order upon activation to prioritize exiting the trade.
What is slippage in trading and how do market orders affect it?
Quick Answer: Slippage is the difference between the expected price of a trade and the price at which the trade is actually executed. Market orders are highly susceptible to negative slippage.
Slippage occurs due to the time delay between when you place an order and when it’s executed, combined with changes in the bid-ask spread. Since market orders seek immediate execution at any available price, they are the most vulnerable to this. Limit orders, by definition, protect you from negative slippage because they cannot be filled at a price worse than you specified.
Key Takeaway: Market orders invite slippage; limit orders prevent it.
Which order type is best for day trading?
Quick Answer: Limit orders are generally considered the best and most professional trading order type for day trading entries and profit-taking due to the precise price control they offer. Stop orders are essential for stop-losses.
Day trading profitability often hinges on very small price movements. By using limit orders, traders can control their entry price, which is essential for calculating an accurate risk/reward ratio. For exits, limit orders ensure profits are taken at a specific target, while stop orders provide disciplined risk control.
Key Takeaway: A combination of limit orders for entry/targets and stop orders for protection is the standard for professional day traders.
Next Step: Understanding Market Environment
Now you know the commands to send to your broker. But sometimes, even if you place your order perfectly, getting it filled easily and at a good price depends on what’s happening in the market itself. Two crucial concepts that really impact this are Liquidity and Volume. Ever wondered why some stocks seem easier to trade than others? These two ideas hold the key.
Let’s explore why they’re so important in our next guide: What is Liquidity and Volume? Why They Matter to Day Traders
Disclaimer: The information provided in this article, including the trade simulation, is for educational purposes only. It is not financial advice. All trading involves risk. The trade example on NVDA is a historical illustration and not a recommendation to buy or sell any security. For more details on order execution, consult an authority like FINRA’s guide on order types.


